Steps to Repair a Water-Damaged Ceiling
Repairing a water-damaged ceiling involves several key steps to ensure safety and effectiveness. The process includes identifying the leak, drying the area, and replacing damaged materials.
- Start by locating and fixing the source of the leak, whether it's from the roof or plumbing. Use tools like moisture meters for accurate detection.
- Turn off the electricity to prevent hazards, and remove any damaged ceiling materials to assess structural integrity.
- Replace insulation and install new drywall, applying joint compound and priming the surface for painting to complete the repair.
To repair a water-damaged ceiling, begin by locating and repairing the source of the leak, whether it’s from the roof or plumbing. Utilize tools such as moisture meters to assess the extent of the damage, and then proceed with necessary repairs to restore the ceiling's integrity.
To fix a water-damaged ceiling, start by finding and fixing the leak. Check the roof and plumbing using tools like moisture meters.
Dry the area with fans and dehumidifiers. Turn off the electricity at the circuit breaker.
Cut out the damaged ceiling parts with a utility knife and check if the ceiling structure is still strong. Look for mold and clean it up if you find any.
Replace the insulation and put in new drywall. Spread joint compound in thin layers and sand between coats.
Prime the surface well so the paint sticks correctly. Follow these steps carefully to repair the ceiling.
Identify the Leak Source
To fix a water-damaged ceiling, you first need to find where the leak is coming from. This means you need to check if the problem is due to roof leaks, plumbing issues, or something else.
Roof leaks often happen in older buildings where the roofing materials are worn out. Look for missing shingles, damaged flashing, or clogged gutters to see if water is getting in from the roof.
Plumbing issues, like leaking pipes or broken fixtures, can also cause ceiling damage. Check the plumbing system, including water supply lines and drainpipes, to see if they are the problem. Tools like infrared cameras or moisture meters can help find hidden leaks that you can’t see with your eyes.
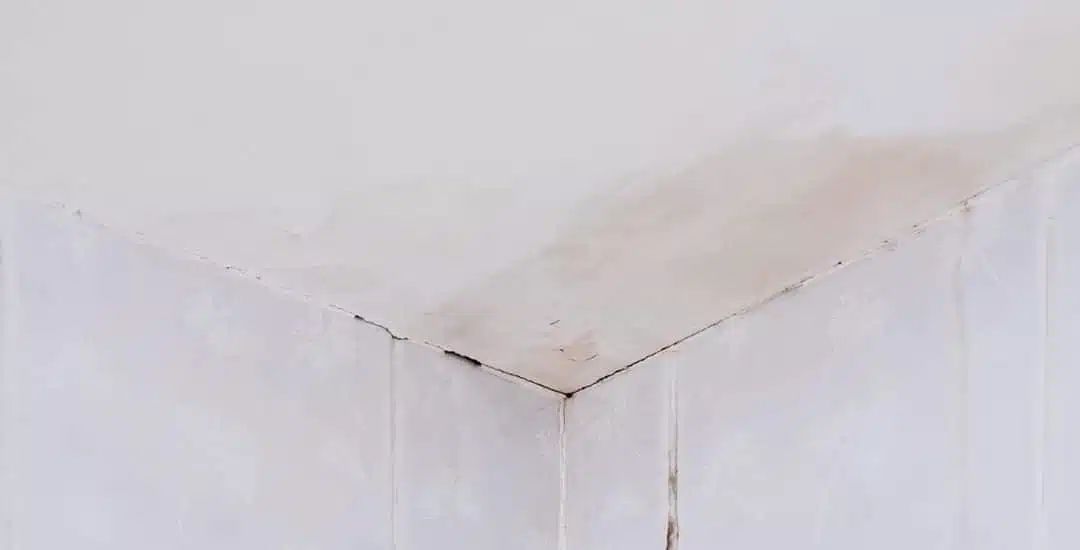
Signs of ceiling damage include discoloration, sagging, or bubbling paint. By carefully looking for the source of the water leak, you can make sure your repairs will be effective and long-lasting, preventing extensive damage to your home.
Contain the Water Damage
It is important to fix water damage right away to stop more problems and prevent mold. First, find and stop the water source, like a leaky pipe or roof. After stopping the source, act fast to keep water from spreading.
Put buckets under the leaking ceiling to catch water. Use towels or sponges to soak up any water on the floor. If the ceiling is bulging from water, make a small hole at the lowest point to let the water out slowly so the ceiling doesn’t collapse.
Take out any wet insulation because it can hold water and damage the ceiling structure. Use fans and dehumidifiers to dry the area faster and stop mold from growing.
Hiring a professional restoration company is a good idea. They have the right tools and know-how to fix the damage and keep your home safe.
Turn Off the Power Supply
After making sure the water damage is contained, turn off the power supply to the area to prevent electrical hazards. This step is crucial to keep everyone safe. Water can conduct electricity, and a water-damaged ceiling increases the risk of electrical shock or fire.
Find the circuit breaker panel and identify the switch for the affected area. Turn off the breaker to cut the power. If you are not sure which breaker controls the area, turn off the main breaker to be safe. Do this before you check for structural damage or remove damaged materials.
If there is a lot of water damage or you are unsure about the electrical parts, call a licensed electrician. They have the skills to safely check and handle the electrical system, reducing further risks.
Making sure the power is off protects people and makes the ceiling repair work safer and more organized. This step is important for the safety and success of the restoration process.
Remove Damaged Materials and Assess Structural Integrity
Remove any loose or damaged ceiling materials to see the structure underneath and find out how bad the damage is. Use a utility knife to cut away sagging drywall, peeling paint, or any other damaged sections. This helps you check if the water stains have caused structural problems or if the damage is minor and easy to fix.
- Find the Damage: Look at the exposed areas to see if the water has damaged the ceiling joists or other parts of the structure.
- Check for Water Stains: Look for water stains to find where the water is coming from and see if there are deeper issues.
- Test Structural Strength: Make sure the framework is strong and not weakened, which could cause more repairs or even a collapse.
- Look for Mold: Check for mold, as it can be a separate problem and might need special steps to fix.
This careful inspection will help you know how much repair work is needed. Fixing both visible and hidden problems will make sure the ceiling is strong and prevent future issues.
Check for Mold
Checking for mold in the water-damaged area is very important. Mold can cause health problems and needs special cleaning methods. Mold likes wet places, and a water-damaged ceiling is perfect for it to grow. The first signs of mold might be discoloration or a musty smell, showing that you need to inspect right away.
Ceiling materials like drywall, plaster, and acoustic tiles are easy places for mold to grow. It is important to check these materials for any mold signs because mold can cause health risks, like breathing issues and allergies, worse. Using a moisture meter can help find hidden wet spots that might have mold.
Fixing mold right away is key to stopping more damage and making sure everything gets fixed properly. Ignoring mold can lead to structural damage and higher repair costs. If you find mold, it is best to call certified mold removal experts to make sure it gets cleaned up correctly.
Dry the Affected Area
To dry the affected area properly, start by removing any standing water and making sure the space is well-ventilated. This is important because it helps stop mold from growing and prevents damage to the building.
- Remove Wet Drywall: Cut and throw out any piece of drywall that got wet. This helps stop water damage and gets rid of ugly stains.
- Use Strong Fans and Dehumidifiers: Place industrial fans and dehumidifiers around the wet ceiling area. These machines help dry out the moisture in the ceiling.
- Check Moisture Levels: Use a moisture meter to keep an eye on humidity levels in the air and drywall. Make sure the moisture levels are safe before starting repairs.
- Ventilate the Area: Open windows and doors to let air flow through. This helps speed up drying and lowers the chance of water damage happening again.
Replace Insulation
Replacing the insulation is important to restore the thermal efficiency and prevent future moisture problems in the affected area. Water damage weakens the insulation’s ability to control temperature and humidity, which can lead to mold growth and structural issues.
Start by taking down the water-damaged ceiling drywall to reach the insulation. Wear protective gear like gloves and masks to avoid exposure to mold spores or other harmful substances.
Once the damaged drywall is gone, check the insulation. If it is wet or moldy, it needs to be replaced. Use a utility knife to cut and remove the damaged insulation. Clean the area well to get rid of any remaining moisture. It is a good idea to use insulation with a high R-value to improve thermal efficiency, especially in areas with extreme weather.
Properly replacing the insulation not only strengthens the ceiling but also helps prevent future expensive repairs. Ignoring this step can lead to more water damage, weakening the ceiling and causing costly fixes. So, paying careful attention to replacing the insulation is key for a complete repair.
Install New Drywall
Once the insulation is properly installed and the area is dry, measure and cut the new drywall panels to fit the ceiling. Use a utility knife to score the drywall, then snap it along the line for a clean cut. Make sure all edges match up with the existing ceiling structure.
Attach the drywall panels with screws, spacing them about 12 inches apart along the framing members. This keeps the panels secure and prevents sagging. Use a drywall screw gun for consistent and efficient work.
- Apply tape over the seams: Place paper drywall tape over all joints to cover the gaps between the panels.
- Embed the tape with joint compound: Press the tape into the joints using a thin layer of joint compound to make it stick well.
- Smooth the surface: Use a drywall knife to smooth out the joint compound and remove any air bubbles.
- Let it dry: Wait for the joint compound to dry completely before moving on to the next steps.
Apply Joint Compound
Applying joint compound over taped seams to achieve a smooth finish requires care and patience. First, choose a good joint compound, also known as drywall mud. Use a putty knife to spread a thin layer over the tape, making sure it sticks well and fills any gaps.
For the first coat, use a 6-inch knife to spread the compound evenly. For the next coats, use wider knives, about 10 to 12 inches, to smooth out the edges and blend the compound into the drywall. Let each coat dry completely before adding the next one to avoid cracks and maintain a smooth and seamless finish.
After the final coat dries, check for any flaws. Use the putty knife for small touch-ups if needed. The goal is to have a smooth surface with no visible seams, ready for the next steps. Do not overwork the compound, as this can make it uneven and slow down drying.
Sand and Prime the Surface for Painting
To get a smooth finish, sand the dried joint compound with a fine-grit sandpaper. Make sure the surface is smooth and free of bumps before you start priming. This helps the patched area blend in with the rest of the ceiling. Pay special attention to the edges where the joint compound meets the original plaster or drywall to avoid visible lines.
After sanding, clean the surface well to remove any dust or debris. This helps the primer stick better. Use a high-quality primer made for ceilings to seal the patched area and get it ready for paint. Priming is important because it:
- Helps the paint stick better, which keeps it from peeling or cracking.
- Creates an even base, so the color and texture look the same.
- Seals porous spots, stopping the paint from soaking in unevenly.
- Blocks stains, like those from water damage.
Let the primer dry completely before painting. This way, the patched area will blend well with the rest of the ceiling, hiding any old damage and making the ceiling look as good as new.