What to Do in the First 24 Hours After a Basement Flood
A basement flood requires immediate action to prevent severe damage and health risks. The first 24 hours are crucial for safety, documentation, and water removal to mitigate long-term issues.
- Prioritize safety by shutting off electricity and inspecting for hazards before entering a flooded area. Take photos of damage for insurance claims and document everything thoroughly.
- Stop the water source if possible, whether from broken pipes or appliances, and contact your insurance company within 24-48 hours to report the damage.
- Remove standing water quickly using appropriate equipment and sort through belongings to salvage items while keeping contaminated materials separate.
In the first 24 hours after a basement flood, prioritize safety by ensuring the area is safe to enter. Document the damage for insurance purposes, contact your insurer, and begin removing water promptly. Taking these steps can prevent mold growth and minimize structural damage, helping to avoid costly repairs.
A basement flood can turn your home into an emergency within minutes. From the moment water enters, the clock starts ticking—and the next 24 hours are critical. Without fast, informed action, moisture can lead to mold growth, structural damage, and serious health hazards that often cost $20,000 to $50,000 or more to repair. While it’s normal to feel overwhelmed, what you do first makes all the difference. Knowing the right steps: prioritizing safety, documenting damage, contacting your insurer, and removing water quickly can stop a manageable situation from becoming a long-term disaster.
Ensure Personal Safety and Identify Electrical Hazards
According to Federal Emergency Management Agency (FEMA), electrocution is one of the leading causes of death during floods because electrical currents can travel through standing water. Any downed power lines should be reported immediately to your utility company or local emergency officials.
Before entering a flooded basement, shut off the main electrical breaker—but only if the panel is completely dry and safely accessible. If the breaker box is wet, submerged, or difficult to reach, do not attempt to turn it off. Contact your electric utility instead so power can be disconnected from outside the home. Water and electricity are a deadly combination, and flooded areas should never be entered while power is still on.
Once electricity is confirmed off, visually inspect for electrical hazards such as exposed wiring, damaged outlets, submerged appliances, wet breaker boxes, or broken conduit. Photograph all visible damage to support insurance claims, and wear rubber-soled boots and waterproof gloves for added protection.
You should also watch for natural gas leaks. A strong “rotten egg” odor signals immediate danger. If you smell gas, leave the building at once and call 911 and your gas utility company from a safe location outside. Do not use light switches, electronics, or anything that could create a spark. Only return after emergency responders or licensed gas professionals confirm the property is safe.
Stop the Water Source If Possible
Once you have addressed electrical dangers and gas line risks, locate the source of water entering your basement and stop it. Different water sources need different solutions. Clean water from broken pipes needs one approach. Sewage water or groundwater needs another.
Water sources and how to control them:
- Broken pipes or plumbing problems – Turn off the main water valve. Look for this valve near your water meter or where the main water line enters your house.
- Broken appliances – Turn off the water supply line that feeds the broken machine. This works for water heaters, washing machines, or sump pumps.
- Water coming from outside – Place temporary barriers or sandbags where water enters. Fix drainage problems around your home’s foundation.
- Sewage backups – Call your local water department or city services. Do not touch this water because it contains harmful bacteria, viruses, and waste materials that cause serious illness.
Contact Your Insurance Company Immediately
After you stop the water, call your insurance company to start your claim. Most insurance policies say you must report damage within 24-48 hours.
Take pictures and videos of all flood damage before you remove water or throw anything away. Make a list of everything the water damaged. Write down when you bought each item and how much it cost, if you can remember.
Talk to your insurance adjuster about what your policy covers. Ask if they will pay for water removal services, repairs to your house structure, and replacement of your damaged belongings. Some homeowners’ insurance policies do not cover certain types of flooding, so ask if your situation qualifies for coverage under your policy terms.
Save all receipts from emergency repairs and water cleanup services. Do not throw away damaged items until your insurance adjuster tells you it is okay. Getting rid of items too soon can reduce the amount of money your insurance company pays you for your claim.
Your insurance company assigns an adjuster to inspect the damage and determine your settlement amount. This person evaluates the extent of water intrusion, structural compromise, and personal property loss.
The adjuster uses your documentation, receipts, and inventory list to calculate your claim payout based on your policy deductible and coverage limits.
Document Everything With Photos and Videos
Complete visual records of flood damage help insurance companies see what happened and process claims faster. Take photos and videos before you clean up water or throw away damaged items. Your pictures need to show all flooded areas, ruined belongings, and how high the water reached.
- Take pictures of water marks on walls, furniture, and equipment – these marks prove how deep the water got and which areas were flooded.
- Write down serial numbers and model names from damaged dishwashers, washing machines, water heaters, furnaces, air conditioners, computers, and televisions.
- Take room-wide pictures that show the full space, then take close-up shots of specific damage to floors, drywall, baseboards, cabinets, and personal items.
- Show where the water came in – photograph broken sump pumps, cracked foundation walls, burst pipes, backed-up floor drains, or failed basement windows.
Insurance adjusters use this evidence when they inspect your home and calculate how much money you should receive.
Keep these photos and videos on your phone, computer, and cloud storage. Make copies for your insurance agent and your own records. The more proof you have, the better your chances of getting a fair settlement that covers repair costs and property replacement.
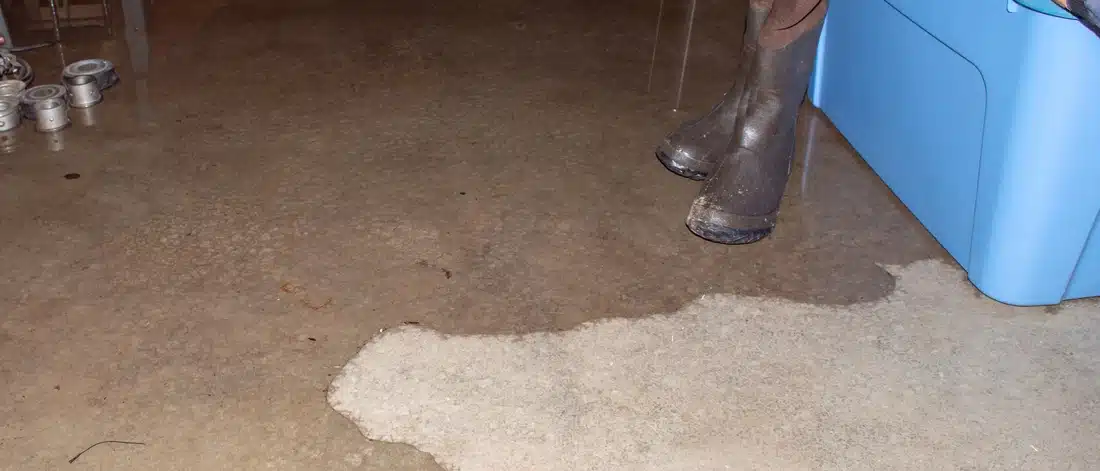
Remove Standing Water as Quickly as Possible
Standing water can quickly damage your home’s foundation, walls, and floors—and mold can begin growing within 24 to 48 hours. Rapid water removal is critical to protecting your property and reducing health risks.
For shallow flooding (under two inches), a wet-dry vacuum is usually effective for pulling water from concrete floors and carpet fibers. Deeper flooding requires a submersible pump, which can remove thousands of gallons per hour. Place the pump at the lowest point of the basement and direct the discharge hose well away from the foundation to prevent water from flowing back inside.
Before starting, confirm that the electricity is fully shut off. Water near outlets, appliances, or electrical panels creates a serious electrocution hazard. If you can’t safely access the breaker or are unsure, contact a licensed electrician.
Begin water extraction in the deepest areas and work toward exits. Remove soaked items like cardboard boxes, rugs, furniture, and debris as you go—these materials hold moisture, spread contamination, and slow drying. Acting fast can mean the difference between salvageable materials and permanent damage, helping protect both your home and personal belongings.
Move Salvageable Items to Dry Areas
Sort through your belongings as soon as water removal starts. Put damaged items in one pile and items you can save in another pile. Move everything you can save to dry spots in your home. This stops more damage and keeps mold from growing.
Start with important papers, computers, phones, and items that mean a lot to you. Handle these items carefully so they don’t get damaged further.
- Take photos of everything – Use your camera or phone to photograph all damaged items and items you’re saving. You need these pictures for your insurance company before you move anything.
- Set up sorting areas – Pick dry spots upstairs or in your garage. Label each area for different types of items like clothes, dishes, furniture, and electronics.
- Lift wet items off the floor – Put damp items on wooden pallets, tables, or plastic storage boxes. Air needs to flow under and around wet things to help them dry.
- Keep dirty water items separate – Put items that touched sewage water or water with chemicals in a different area from items that only touched clean floodwater. Mark these areas clearly.
Work through your home one room at a time. Keep your sorted piles organized. This makes it easier to restore your belongings and file your insurance claim.
Label boxes and bags with what’s inside and which room items came from.
Assess and Address Contamination Risks
Floodwater often contains bacteria, viruses, toxic chemicals, and sewage—and these hazards can remain long after the water recedes. Always assume flooded materials are unsafe unless professional testing proves otherwise.
Before entering a flood-damaged area, wear waterproof boots, thick rubber gloves, safety goggles, and an N95 mask. Avoid direct skin contact with floodwater and any items it touched.
Flood contamination falls into three general categories. Category 1 (clean water) comes from broken supply lines or clean tanks and poses a low health risk. Category 2 (gray water) comes from appliances or toilets without solid waste and carries a moderate health risk. Category 3 (black water) comes from sewage, rivers, or standing floodwater and presents a serious health danger that requires professional cleanup.
Porous materials exposed to Category 2 or 3 water should be discarded. This includes drywall, insulation, carpeting and padding, upholstered furniture, mattresses, and particle board. These materials absorb contaminants deep inside, making them impossible to fully clean and prone to rapid mold and bacteria growth.
Hard, non-porous surfaces such as tile, metal, and solid wood can usually be saved. Remove all visible dirt and debris first, then clean and disinfect using EPA-approved products. Always follow label instructions for proper dilution and contact time to ensure effective sanitation.
Set Up Fans and Dehumidifiers for Air Circulation
Water that stays in walls, floors, and air lets mold grow within 24 to 48 hours after a flood. Moving air speeds up drying and stops harmful microorganisms from spreading.
Place equipment in smart spots to dry your space fast while keeping everyone safe from electrical hazards.
Equipment setup steps:
- Set industrial fans at 45-degree angles pointing toward walls and wet surfaces to turn water into vapor and keep air moving in corners.
- Put dehumidifiers in the middle of rooms with space around all sides so air can flow in and out without blockage.
- Keep equipment running non-stop for 24-72 hours, pouring out water from dehumidifier tanks every 8-12 hours so the machines work at full strength.
- Open windows when outside air is dry to push out damp indoor air, but shut windows when outdoor humidity goes above 60 percent.
Check temperature and moisture levels every hour with a hygrometer (a tool that measures humidity). Target indoor humidity below 50 percent to stop mold spores from taking hold.
Document readings in a log to track drying progress and identify problem areas that need extra attention. Keep fans and dehumidifiers away from standing water and use ground fault circuit interrupter (GFCI) outlets to prevent electrical shock.
Replace wet insulation and remove soaked materials like carpet padding that trap moisture and block airflow.
Remove Wet Carpeting, Padding, and Porous Materials
Porous materials soak up water like sponges. These waterlogged items become perfect places for mold growth, bacterial colonies, and rot that damage your property and threaten your family’s health. Wet carpeting and padding hold moisture for days or weeks, so you must remove them within the first 24 hours after flooding.
Use a utility knife to cut the carpeting into smaller sections you can handle. Roll each section tightly and throw it away right away. Padding falls apart fast when it gets soaked and cannot be saved.
Check your drywall, if water has climbed more than 12 inches up from the floor, that section needs to come out. Water-damaged drywall loses its strength and traps harmful germs and contaminants inside.
Cardboard boxes, paper products, magazines, books, and fabric items like curtains or upholstered furniture must go in the trash. These materials cannot be properly cleaned or dried once flood water touches them.
Wear safety gear during the removal process. Put on waterproof gloves, an N95 respirator mask, and rubber boots. Flood water often contains sewage, chemicals, and other hazardous substances.
Take clear photographs of every item you throw away before you move it to the curb or dumpster. Your insurance company needs this documentation to process your claim. Label each photo with the item name, purchase date if known, and estimated value.
Place all removed materials at the curb for special flood debris pickup or load them into designated disposal containers approved by your local waste management department.
Check for Structural Damage and Warning Signs
Every basement flood damages the foundation, support beams, and load-bearing walls that keep your house standing. Water soaks into these structural components, weakening them and creating collapse risks. You must inspect for critical warning signs before starting any cleanup work.
Structural damage signs that need a professional inspection:
- Cracks in foundation walls or floors – New breaks or expanding cracks mean the foundation is shifting or settling. Water pressure and soil washing away from around the foundation cause this movement.
- Sagging or bowing support beams – Wood beams soak up water and lose strength quickly. Steel beams can rust where they connect to other parts.
- Tilting or separating walls – Walls pulling away from the ceiling mean serious structural damage. Leave the building and call an expert right away.
- Strange sounds or movements – Creaking, popping, or floors that bend when you walk on the level above need a professional inspection right away.
A structural engineer can determine if your foundation has sustained damage from hydrostatic pressure (water pushing against walls from outside).
A building inspector will check if support columns and floor joists can still carry the weight of your home safely.
A licensed contractor should examine any masonry damage, concrete deterioration, or compromised load paths.
These professionals use moisture meters, laser levels, and structural assessment tools to measure the extent of damage and develop repair plans that meet local building codes.
Disinfect All Affected Surfaces
Once you confirm your basement structure is safe to enter, you must clean all surfaces touched by floodwater. Floodwater carries dangerous germs, bacteria, and viruses that can make people sick. These microorganisms come from sewage systems, animal waste, chemicals, and soil contaminants that mix with rising water.
Every wall, floor, and fixture needs proper disinfection with EPA-approved cleaning products or a homemade bleach solution. Mix one cup of household bleach with one gallon of clean water to create an effective disinfectant for flood damage restoration.
Personal protective equipment is required during all cleaning work. Wear rubber gloves that cover your forearms, waterproof boots, and N95 respirator masks to prevent exposure to harmful pathogens and mold spores. Put on protective eyewear to guard against chemical splashes.
Apply your disinfectant solution using spray bottles for walls and mops for floors. The cleaning solution must stay wet on surfaces for at least ten minutes to kill germs properly. Wipe down all treated areas with clean cloths after the contact time ends.
Porous building materials like drywall, insulation, carpet, and ceiling tiles absorb contaminated water deep into their structure. These materials cannot be properly cleaned and must be removed and replaced to prevent ongoing health hazards and mold growth in your home.
Take photographs of all damaged areas before, during, and after your disinfection work. These images serve as evidence for insurance claim processing and create records of your flood recovery efforts. Keep written notes of dates, cleaning products used, and areas treated.
Monitor for Early Signs of Mold Growth
Mold spores start growing on wet basement surfaces within 24 to 48 hours after water damage occurs. Homeowners need to check all areas carefully to find mold before it spreads to other parts of the home.
Look in spots where water collects, and air doesn’t flow well, such as behind boxes and furniture, under carpet and padding, and inside wall spaces that got wet.
- Strange smells – A damp, earthy odor means mold is growing somewhere, even if you can’t see it yet.
- Spots and stains – Black, green, or white marks showing up on walls, floors, or ceilings.
- Wet surfaces – Any material that stays damp longer than 24 hours gives mold the perfect place to grow quickly.
- Damaged building materials – Walls that bulge or bend, wooden baseboards that swell up, or insulation that falls apart all mean water has been present too long and needs fast action.
Take photos of everything you find. These pictures help with insurance claims and show mold removal specialists what work they need to do.
Professional remediation services use these records to create treatment plans that address all affected areas in your basement and prevent future fungal contamination in your property’s structure.
Contact Professional Water Restoration Services
Professional water restoration companies have special tools and training that most homeowners don’t have for complete flood cleanup. These services use powerful water pumps, large-scale dehumidifiers, and moisture sensors to find hidden water inside walls and under floors. Trained technicians check for building damage, test how dirty the water is, and use the right cleaning methods for each situation.
Most trusted companies provide 24-hour emergency service. They usually arrive within two to four hours after you call. Licensed restoration experts create detailed records that help with insurance claims. These records include photos of the damage, moisture level measurements, and complete damage reports.
Getting professional help right away lowers total restoration costs. Quick action stops additional problems like mold growth, rotting wood, and weakening of your home’s structure. Homeowners should check company’s qualifications before hiring it. Look for IICRC certification (Institute of Inspection, Cleaning and Restoration Certification), which shows the company meets industry standards for water damage restoration.
Water damage restoration involves several phases: emergency water removal, drying and dehumidification, cleaning and sanitizing, and final restoration work. The category of water contamination determines the safety procedures technicians must follow. Category 1 (clean water) requires basic extraction. Category 2 (gray water) needs sanitization. Category 3 (black water) demands specialized hazmat protocols.
Professional restoration protects your property value and your family’s health. Water damage creates conditions where harmful bacteria and mold spores multiply quickly. Certified technicians have the knowledge to handle these health risks safely.
Protect Undamaged Areas From Spreading Moisture
Water moves fast from flooded rooms into dry spaces through air flow, touching surfaces, and soaking through walls and floors.
Setting up barriers stops damage from spreading to rooms that are still dry. Blocking water from moving into clean areas costs less to fix and saves items that aren’t damaged yet.
Essential steps to contain water damage:
- Close doors between wet and dry rooms, and place rolled towels at the bottom to stop water from seeping under the door frame.
- Move wet objects away from dry walls, floors, and furniture so moisture doesn’t transfer from wet surfaces to dry ones through physical contact.
- Turn off heating and cooling systems to prevent fans and vents from pushing damp air and water particles into other parts of your home or building.
- Set up plastic barriers using plastic sheets at doorways and openings that won’t close all the way, and tape down the edges to seal them.
Use moisture meters to check humidity in rooms next to the flooded area.
This confirms your barriers work correctly and keeps damage from spreading.
Keep Detailed Records of All Expenses and Actions Taken
Writing down every action, cost, and observation during flood recovery affects whether your insurance company approves your claim and how much money you receive.
Take photos of all the damage from different sides before you start cleaning. Capture water stains on walls, ruined materials, and broken belongings in your pictures. Write down the exact times when the flood started, when you called emergency services, and when cleanup began.
Keep every receipt for emergency supplies like tarps and buckets, rented equipment such as dehumidifiers and pumps, and professional services, including water extraction companies and restoration contractors.
Write a daily log that describes what you removed, how you threw items away, and what safety steps you took, like wearing protective gloves and masks.
Write down all conversations with insurance adjusters. Include their full names, phone numbers, the date you spoke, and what they said about your coverage limits and deductibles.
Keep samples of contaminated drywall or flooring if your insurance adjuster asks for them. Make a list of damaged property with details about when and where you bought each item, original prices, and model numbers when you have them.
Store copies of all paperwork in two places: save digital files to cloud storage services and keep paper copies in waterproof bags or containers outside the flooded area.
This protects your flood insurance claim documentation if more water damage occurs.