Insurance Documentation Essentials: Photos
Clear photos are essential for supporting insurance claims related to property damage. They provide crucial visual evidence that helps adjusters assess the extent of damage and determine compensation.
- Photos must capture all angles of damage, including structural elements and personal belongings. This documentation creates a factual account for insurance adjusters to evaluate.
- Taking pictures immediately after damage occurs is vital to preserve evidence and establish a timeline. Daily updates during repairs help track progress and changes.
- Organizing images with date and time stamps strengthens claims by proving when damage occurred and supporting repair cost estimates.
Photo documentation is crucial for insurance claims as it provides visual evidence that helps adjusters verify losses and assess damage. Clear and organized photos can expedite the approval process and ensure accurate compensation, while inadequate documentation may result in overlooked details, lower payouts, or disputes.
When your home, vehicle, or personal belongings are damaged, clear photos can determine whether your insurance claim is approved quickly, reduced, or denied. Insurance adjusters rely heavily on visual evidence to verify losses, assess the extent of damage, and calculate compensation. Without strong photo documentation, important details may be overlooked, leading to lower payouts or claim disputes. Unfortunately, many policyholders don’t know what to photograph, which angles matter, or how to organize their images.
Learning the right documentation approach —capturing wide shots, detailed close-ups, identifying information such as serial numbers, and supporting records such as receipts—creates a clear visual record of the damage. Well-organized, date-stamped photos make it easier for adjusters to understand the situation, verify your losses, and process your claim more efficiently.
Why Photo Documentation is Critical for Insurance Claims
When property damage or loss happens, photos serve as the main way to show what went wrong and how bad it is. Visual records create a factual account that insurance adjusters, appraisers, and claims handlers use to check what policyholders report and figure out how much money to pay.
Photos remove confusion in damage evaluation by showing specific details that words alone cannot explain well. They record what the property looked like before the loss, how it looked right after the damage, and any changes that happened over time. This timeline of evidence becomes especially important when disagreements occur about whether a claim is valid or how much the settlement should be.
Insurance companies need photo proof to handle claims quickly and stop false submissions. Without visual records, policyholders may get their claims denied, receive less money than expected, or wait longer for decisions. Photos change damage reports from personal opinions into measurable, checkable facts that help reach fair claim outcomes.
The relationship between documentation quality and claim success rates shows why taking clear pictures matters. Property owners should photograph all angles of damage, include reference objects for scale, capture date and time stamps, and store images securely.
Insurance professionals rely on these visual artifacts to apply policy terms correctly and determine accurate replacement costs or repair estimates.
When to Start Taking Photos After Property Damage
The time you start taking photos can mean the difference between complete documentation and missing evidence after property damage happens. Property owners need to begin taking pictures right after making sure everyone is safe and getting permission from emergency workers, like firefighters or police.
Waiting too long lets conditions change, evidence vanish, and details become harder to remember.
Key times for taking damage photos:
- Right away – Take pictures of the initial damage within hours of finding it, before making temporary fixes or starting cleanup.
- Ongoing records – Take new photos daily during the first week, then once a week while repairs continue.
- Before repairs start – Take detailed photos 24 hours before contractors begin work to show how things looked before restoration.
Insurance adjusters need photos taken at the time damage occurred showing how problems developed. Digital photos contain hidden information called metadata that shows the date and time each picture was taken.
This data proves when you documented the damage, making your insurance claim stronger and preventing arguments about when damage happened.
Property damage documentation includes several components: the damaged structure or contents, the source of damage (like water leaks, fire, storm impact, or vandalism), the extent of destruction, and surrounding areas for context.
Photos should capture structural elements (walls, floors, ceilings, foundations), personal property items (furniture, electronics, clothing, documents), and environmental conditions (standing water depth, smoke residue, debris patterns).
Taking photos creates a visual record that insurance companies, contractors, and legal representatives can review. This evidence supports claim amounts, repair estimates, and potential legal proceedings related to property damage incidents.
Types of Damage You Should Always Photograph for Insurance
Some types of property damage need clear photo evidence to prove your insurance claim and avoid arguments with your insurance company.
Building Damage
Take many photos of damage to your home’s structure. This includes cracks in your foundation, broken or missing roof shingles, holes or cracks in walls, and damaged support beams or columns.
Water Damage
Document where water has caused harm. Photograph water stains on ceilings and walls, places where water collected on floors, warped wood or drywall, and spots where moisture soaked through materials.
Fire and Smoke Damage
Capture evidence of fire destruction. Take pictures of burn marks and patterns, black soot on walls and objects, items damaged by heat, and plastic or metal parts that melted.
Damaged Belongings
Record all personal items that suffered harm. Take photos from different angles of each damaged item. When you can see serial numbers, model numbers, or brand names, photograph these details.
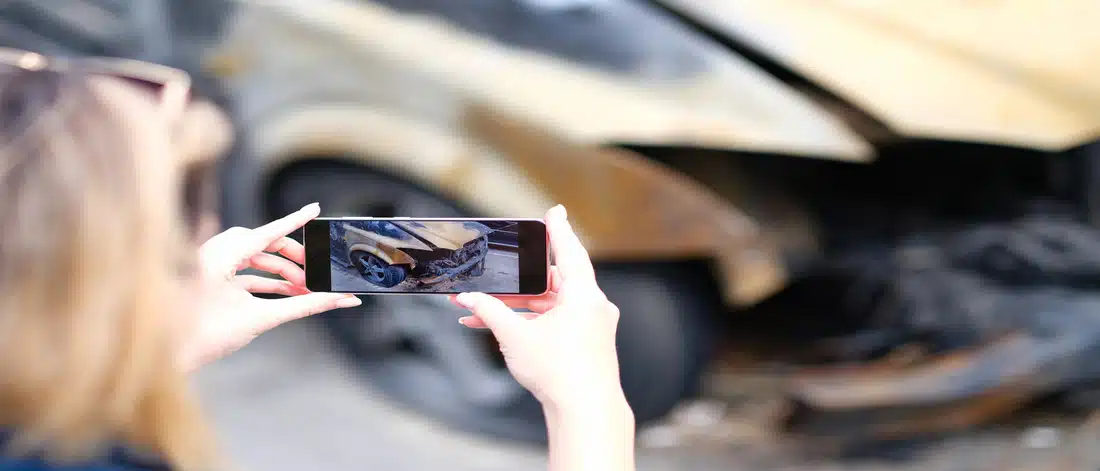
Car Damage
Document vehicle problems with photos of dented or scratched areas, broken mechanical parts under the hood, and damage inside the car’s cabin.
Storm Damage
Record destruction from severe weather conditions. Photograph dents from hailstones, damage from strong winds, trees or branches that fell on your property, and broken windows or siding.
Take these photos before you make any temporary fixes.
Each photo must clearly show what was damaged and how bad the damage is.
How Photos Strengthen Your Insurance Claim Evidence
Photographs turn a homeowner’s description of property damage into concrete proof that insurance adjusters can examine and evaluate. Visual records remove confusion about how bad the damage is and what type of loss occurred.
Photos create a factual account that backs up claim values. Insurance companies use photographic evidence to confirm that damage happened during the policy coverage dates and matches what the policyholder reported.
Key ways photographs strengthen claim evidence:
- Show damage scope – Wide shots display the complete area of damage, while zoom-in photos capture specific problems like cracks, water stains, or structural issues that written reports might miss.
- Prove the timeline – Digital photo data shows the exact date and time you took each picture, which proves when you found the damage and helps establish that your claim is real.
- Back-up repair costs – Clear images of damaged roofs, walls, flooring, appliances, and personal belongings let adjusters calculate accurate repair bills without making multiple trips to your property.
Photos document the before-and-after condition of your home or vehicle, protect you from disputes about the damage severity, and speed up the claims process by giving adjusters the information they need to approve payments.
Before-and-After Photos: Proving the Full Extent of Damage
Property owners need to take photos of their belongings, home features, and property condition regularly. These initial pictures show what everything looked like and how much the items were worth before any damage happened.
When damage occurs, take new photos from the same spots and angles. This makes it easy to see exactly what changed.
Digital cameras and smartphones attach time and date stamps to each photo file. These stamps prove when you took each picture. Keep your original photos somewhere other than your property—cloud services like Google Photos, Dropbox, or iCloud work well.
Physical copies stored at a friend’s house or a safety deposit box also protect these records if your home suffers damage.
When contractors perform repairs or renovations, photograph every step of the work. Take pictures before work starts, during the project, and after completion.
This photo timeline shows the quality of repairs and stops insurance companies from claiming that fresh damage was already there before the loss event.
The photo record serves as evidence during the claims process. Insurance adjusters use these images to verify your descriptions of damage and losses.
Clear before-and-after comparisons remove disputes about what condition your property was in originally. This documentation protects your right to full compensation for covered damages.
The Best Angles and Perspectives for Insurance Documentation Photos
Taking pictures of property damage looks simple, but where you position your camera changes how useful those photos become as proof. Insurance adjusters need specific visual details to evaluate claims correctly, which makes camera placement a key part of successful documentation.
Important angles for complete damage documentation:
- Head-on shots at the same height as the damage – Hold the camera straight across from damaged surfaces, which prevents the warping effect that happens when you shoot from above or below. This method shows an accurate view of cracks, dents, or wear on materials like drywall, siding, or vehicle panels.
- Wide shots showing the surrounding area – Move backward to photograph the damaged item along with everything around it. These environmental context photos establish location relationships and show how the damage connects to nearby walls, furniture, fixtures, or building structures.
- Extreme close-up shots of specific problems – Position your camera lens within a few inches of individual damage points. These macro-level images reveal surface textures, material breakdown patterns, and small defects that remain hidden at normal viewing distances. This photographic evidence provides concrete proof of the extent and severity for claim verification.
Each perspective serves a distinct documentation purpose: head-on angles capture dimensional accuracy, wide frames establish spatial context within the property, and close-ups document granular physical evidence that insurance professionals require for claims processing and settlement decisions.
Wide Shots vs. Close-Ups: Capturing Complete Damage Details
Effective property damage documentation requires a mix of wide-angle and close-up photos. Using both types creates a clear, complete visual record that insurance adjusters rely on when reviewing claims.
Wide shots provide context. These photos capture entire rooms, walls, or exterior sections of a property, helping adjusters understand where the damage occurred and how much area it affects. By showing the surrounding space, wide images establish the scope of the problem and how the damaged area fits within the overall structure.
Close-ups focus on the specific damage. These images highlight details such as cracks in drywall, water stains on ceilings, warped flooring, mold growth, or broken materials. The added detail helps verify the type of damage, its severity, and possible causes.
For the strongest documentation, take photos from multiple distances:
- Overview shots (20+ feet): Show the entire room, building exterior, or affected area to establish the overall condition of the property.
- Wide shots (10–20 feet): Capture the location of damage within the room or structure.
- Medium shots (4–8 feet): Document specific sections where damage is concentrated.
- Close-ups (6–18 inches): Clearly show cracks, stains, material damage, or other visible issues.
- Macro shots (2–6 inches): Capture fine details like tiny fractures, mold growth, or material deterioration for expert review.
Each type of photo serves a different purpose. Together, they create a detailed visual narrative that helps insurers accurately assess damage and process claims more efficiently.
How to Document Structural, Interior, and Personal Property Damage
Knowing what to photograph matters as much as knowing how to take the pictures. Insurance companies need organized records that show damage in three main areas.
What you need to photograph:
- Building structure damage– Take pictures of your home’s foundation, walls, roof, windows, and doors. Shoot from different positions to show the full extent of damage. Focus on cracks in concrete or drywall, water coming through surfaces, bent or twisted wood, and support beams that look unsafe.
Place an object like a ruler or coin next to damage to show its size. Include shots that reveal where the damage sits in relation to rooms, entrances, or building corners.
- Inside space damage– Record problems with floors, ceilings, cabinets, countertops, and wall treatments like paint or tile. Capture water marks, black or green mold patches, smoke residue, burnt materials, and broken heating systems, air conditioners, or hot water tanks.
Show how damage affects built-in appliances and permanent fixtures.
- Belongings damage– Take one photo of each damaged item that shows brand names, serial number plates, and model tags. Keep purchase receipts or price tags in frame when you still have them.
Start with wide shots showing categories of damaged items (all electronics together, all furniture together), then photograph each piece separately with clear views of tears, dents, stains, or broken parts.
This organized approach creates a complete damage inventory that insurance adjusters can verify and process for your claim settlement.
Common Photo Documentation Mistakes That Can Hurt Your Claim
Taking pictures of damaged property requires attention to detail. Simple mistakes in photo documentation give insurance companies reasons to reduce payments or reject claims entirely.
Blurry or Out-of-Focus Images
Insurance adjusters cannot assess damage levels from unclear photographs. Blurry images fail to show cracks, water stains, or structural problems accurately. Companies may reject these photos as unreliable evidence.
No Date or Time Information
Photos without timestamps create problems proving when the damage happened. Insurance companies need this information to link damage to specific events like storms, fires, or floods. Missing time data leads to disputes about what caused the damage.
Lack of Size References
Damage assessment requires understanding the scale. Photos without common objects like rulers, coins, or everyday items prevent accurate size measurements. Insurance companies can claim that damage appears smaller than reality, reducing repair cost estimates.
Missing Wide-Angle Views
Close-up shots alone hide the complete picture. Wide-angle photographs show how damage affects entire rooms, walls, or building sections. Without these broader views, insurers underestimate total destruction.
Deleted Original Files
Original digital photos contain embedded data (metadata) that proves when and where pictures were taken. Deleting originals or only keeping edited versions removes this verification information. Insurance companies may question photo authenticity without metadata.
Delayed Documentation
Waiting multiple days before taking photos allows conditions to change. Weather, humidity, and secondary damage can alter scenes. Insurance adjusters may argue that problems existed before the claimed incident, attributing damage to poor maintenance rather than covered events.
Each documentation error gives insurance providers justification to lower claim payments or deny coverage completely.
Organizing and Labeling Damage Photos for Insurance Adjusters
After taking clear photos of the damage, homeowners need to organize their pictures in a way that makes sense to insurance adjusters. Good organization helps claims get processed faster and makes sure important evidence doesn’t get missed.
How to Organize Your Photos:
- Put photos in time order – Sort pictures by the date and time they were taken. Start with photos from when you first found the damage, then show how things changed over time, including any emergency repairs you made. This timeline helps adjusters understand when the damage happened and decide what your insurance policy covers.
- Group photos by location – Sort images based on where the damage occurred in your home. Put all kitchen water damage photos together, all bedroom ceiling damage together, and all exterior roof damage together. This method matches how repair contractors write their estimates and how adjusters take notes during inspections.
- Give files clear names – Change the automatic camera file names (like IMG_1234.jpg) to names that describe what’s in each photo. For example, use “2024-01-15_Kitchen_FloodDamage_NorthWall.jpg” instead. Good file names tell the adjuster what they’re looking at without opening every single picture. This saves time when submitting your claim online and when the adjuster reviews your documentation.
This organizational system creates a complete record of property damage that insurance professionals can trust and understand quickly.
Each labeling method connects to standard insurance claim procedures and adjuster workflows.
Using Your Smartphone Effectively for Damage Documentation
Modern smartphones have cameras capable of producing high-quality photos that insurance companies can use when evaluating a claim. With the right settings and a few simple techniques, your phone can capture clear, detailed images that accurately document property damage.
- Optimize your camera settings first: Set your camera to the highest available resolution so images capture as much detail as possible. Turn on HDR (High Dynamic Range) mode as well. HDR balances bright and dark areas in the same photo, helping you clearly capture details in shadowed spaces, ceilings, windows, and reflective surfaces that might otherwise appear washed out or too dark.
- Use simple techniques to improve photo quality: Enable grid lines on your camera screen to keep your phone level and properly frame each shot. Straight, well-aligned photos look more professional and make it easier for adjusters to review the damage. Whenever possible, rely on natural or room lighting instead of flash. Flash often creates glare and harsh shadows that can hide important details or distort colors. Before starting, also check your phone’s available storage to make sure you have enough space to capture all necessary documentation.
- Capture helpful photo data: Turn on geo-tagging in your camera settings so each photo records GPS location data. This metadata helps verify where the damage occurred and can support your claim during review. Finally, clean your camera lens with a soft cloth before taking pictures. Even small smudges can make images appear blurry and obscure critical damage details.
Taking a few minutes to adjust these settings ensures your smartphone photos clearly document the damage and provide reliable evidence for your insurance claim.
How Restoration Professionals Use Photos to Support Insurance Claims
Property owners who take pictures of damage with their phones create the starting point for restoration professionals. These experts organize images into time-ordered sequences that show damage progression and restoration scope. They improve documentation by adding technical notes, measurements, and professional photos that support the original claim.
Restoration professionals use photographic evidence through specific methods:
- Comparison documentation – Creating before-and-after photo sets that prove the amount of damage and confirm restoration costs.
- Technical photography – Taking pictures of moisture meter readings, structural problems, and hidden damage with special camera equipment that adds to standard documentation.
- Progress tracking – Photographing each restoration step to prove work completion and explain invoiced services.
This complete photographic record becomes the proof that supports claim negotiations with insurance adjusters and approval processes with insurance companies.
The systematic collection of damage photos, moisture readings, and restoration images creates a visual timeline that insurance adjusters require for claims processing. Water damage restoration, fire damage repair, and mold remediation projects all demand this type of photographic evidence.
Professional restoration companies combine property owner smartphone photos with thermal imaging cameras, moisture meters with photo capability, and high-resolution DSLR cameras to document structural damage, content loss, and mitigation efforts.
Insurance claim packages include categorized photo folders showing initial damage assessment, emergency mitigation work, demolition phases, drying equipment placement, and final restoration results.
This documentation system protects both the policyholder seeking fair compensation and the insurance carrier verifying legitimate repair costs.
Creating a Visual Record That Speeds Up Insurance Approval
Insurance adjusters process claims 40-60% faster when they receive organized photo evidence within 48 hours after damage happens. A good visual record needs systematic photos of damaged areas from different angles. Take wide shots to show the whole scene and close-ups to capture small details. Put a common object like a ruler or coin in each photo to show size. Turn on your camera’s timestamp feature so each photo shows when you took it.
Document the entire damage timeline with photos. Start when the damage first occurs. Continue taking photos during cleanup. Keep photographing through the repair and restoration work. This creates a complete visual story of what happened.
Sort your photos into clearly marked folders. Keep three separate categories: building damage (walls, roof, foundation), personal items (furniture, electronics, clothing), and prevention work (water removal, temporary repairs, boarding up). When adjusters can find what they need quickly, they approve claims faster.
Take photos of important product details. Capture serial numbers on appliances and electronics. Photograph model numbers and brand names. Include pictures of receipts and proof of purchase documents. These specific details prove ownership and value.
This organized method stops delays that happen when adjusters ask for more proof. Claims that might take weeks can finish in just days. The difference comes from giving adjusters all the evidence they need the first time. Complete documentation means fewer questions, faster answers, and quicker payment of your insurance claim.