Hailstorms and Hidden Water Intrusion: How Roof Impacts Lead to Interior Damage
Hailstorms can cause significant and often hidden damage to roofs, leading to serious interior issues if not addressed promptly. Understanding the impact of hail on roofing materials helps property owners prevent costly repairs by identifying damage early.
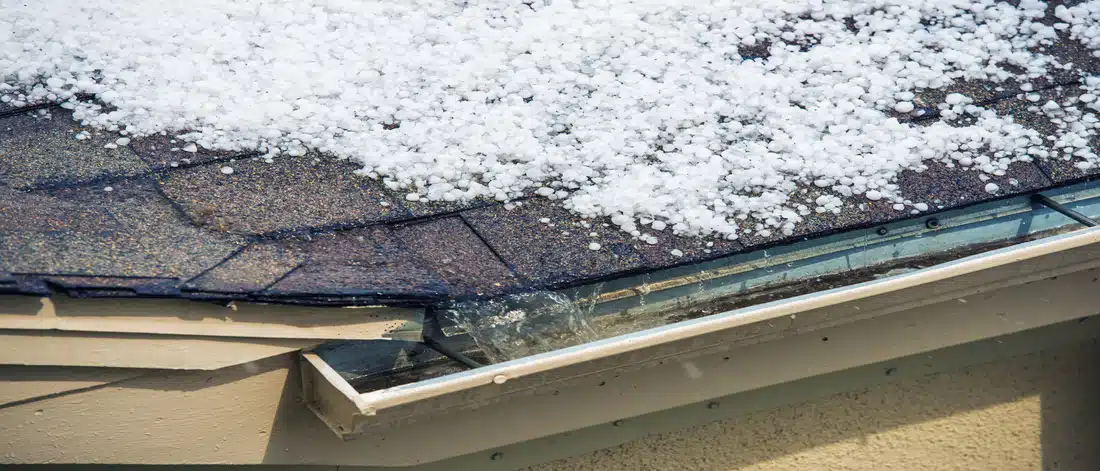
- Hailstones larger than one inch can fracture shingles and create openings for water intrusion. This damage often remains hidden until moisture causes visible interior problems.
- Different roofing materials respond uniquely to hail impacts, leading to various types of damage that can compromise the roof's integrity.
- Regular inspections after hailstorms are crucial to detect hidden damage and prevent structural deterioration from trapped moisture.
Hailstorms can severely damage roofs by fracturing asphalt shingles, loosening granules, and tearing waterproof membranes. These impacts create small openings that allow rainwater to infiltrate, often going unnoticed until moisture causes interior water stains, mold growth, and structural damage. Understanding this process helps property owners take timely action.
Hailstorms that produce stones larger than one inch can damage a roof far beyond what is visible from the ground. When hail strikes with significant force, it can fracture asphalt shingle layers, loosen protective granules, tear waterproof membranes, and bend or crack metal flashing. These impacts often create tiny openings in the roofing system that allow rainwater to penetrate beneath the surface. Because this damage is frequently hidden, it may go unnoticed until moisture begins moving through the roof decking, insulation, and structural framing. Over time, that trapped moisture can lead to interior water stains, mold growth, and costly structural repairs. Understanding how hail impacts lead to hidden water intrusion helps property owners act quickly after a storm and prevent minor roof damage from turning into major interior restoration.
The Anatomy of Hail Impact: What Happens When Ice Meets Roofing Materials
When hailstones strike roofs, different types of damage occur based on how fast the ice is moving, what the roof is made of, and the angle at which the hail hits. Each roofing material responds to hail impact in its own way.
- Asphalt shingles develop bruises where the hail knocks off the protective granules (small rock particles bonded to the surface). This exposes the fiberglass or organic mat underneath. Without this granule layer, UV rays from the sun break down the shingles faster, shortening the roof’s lifespan.
- Metal roofs get dents that crack or scratch the protective paint coating. These damaged spots become weak points where rust can start. The dents also create areas of concentrated stress in the metal panel.
- TPO and EPDM rubber membranes can puncture or crack when the force from the hailstone is stronger than the material can handle. The impact stretches the membrane past its breaking point.
- Clay and concrete tiles crack from the direct force of impact. The shock travels through the brittle material, causing fractures.
- Wood shakes split along their natural grain lines where the wood fibers run parallel.
All these damage types create openings where water can get into the roof structure underneath.
Rain, snow, and moisture then cause rot, mold, and structural deterioration.
The amount of damage depends on three main factors: how fast the hail is falling (impact velocity), how big the hailstone is (diameter), and how brittle the roofing material is at the moment of impact.
A 2-inch diameter hailstone falling at maximum speed hits with about 52 pounds of force—enough to damage most residential roofing materials.
How Hailstones Compromise Shingle Integrity and Protective Granules
Asphalt shingles depend on small ceramic-coated mineral pieces called granules to protect roofs. These granules act as shields against sun damage (UV rays), weather wear, and fire. When hailstones hit a roof, they knock off these protective granules through direct force. Each impact creates a circular bare spot on the shingle, usually one to three inches wide. The size of this damaged area depends on how big the hailstone was and how fast it traveled.
Hail damage goes deeper than just the surface layer. The impact breaks down the fiberglass mat that reinforces each shingle from underneath. This internal damage shows up as cracks in the asphalt coating that holds the shingle together. These cracks weaken the shingle’s ability to stretch and bend without breaking.
Small cracks become entry points where rainwater seeps through the roof membrane. The dents left by hailstones also change how water flows off the roof. Instead of running down smoothly, water pools in these small dents. Standing water speeds up rot and breakdown, which can expose the wooden roof deck underneath to moisture damage.
The Hidden Damage: Underlayment and Decking Vulnerabilities
Hail damage often extends beyond visible shingle dents. The force of large hailstones can compromise multiple layers of the roofing system, creating hidden pathways for water intrusion and structural deterioration.
Common issues caused by hail impacts include:
- Puncture Damage
Large hailstones can pierce felt paper or synthetic underlayment, creating direct entry points for rainwater to reach the plywood or oriented strand board (OSB) roof decking beneath the shingles.
- Compression Bruising
The impact force can compress and weaken the underlayment layer, reducing its ability to block moisture. This type of damage often leaves little or no visible evidence on the roof surface, making it difficult to detect during basic visual inspections.
- Fastener Seal Failure
Hail strikes can break the seals around roofing nails and staples. Once these seals are compromised, water can travel along the fastener shafts through capillary action, slowly penetrating deeper into the roof assembly.
Structural Consequences of Moisture Intrusion
When water reaches the roof decking, more serious structural problems can develop, including:
- Delamination of wood layers in plywood or OSB decking
- Mold and fungal growth within damp structural materials
- Reduced load-bearing strength, weakening the roof structure
- Full deck panel replacement instead of simple shingle repairs
Because many of these issues occur beneath the visible roofing surface, a professional post-hailstorm roof inspection should evaluate the entire roofing system, not just the shingles, to identify hidden moisture pathways and prevent costly interior damage.
Microscopic Breaches: How Small Cracks Become Major Water Entry Points
Standard roof inspections cannot detect hairline fractures in shingles, tiles, and waterproof membranes. These tiny cracks measure less than 0.5 millimeters wide, thinner than a credit card edge. The small openings create serious weak points that damage the entire roof protection system.
Water molecules move through these microscopic cracks using capillary action, the same force that pulls liquid up through a paper towel. Moisture travels through the shingle material layers and membrane sheets. Temperature changes from hot days to cold nights make cracks grow larger. Each freeze-thaw cycle causes ice expansion inside the fractures. After just two winter cycles, the original crack width increases by 300%.
Once water enters through surface cracks, it spreads sideways underneath undamaged shingles and roofing materials. The moisture follows the easiest path, moving along seams where underlayment sheets connect and around nail holes where fasteners pierce the roof layers. Water pools on the plywood or oriented strand board (OSB) decking beneath the weatherproofing materials.
The trapped moisture soaks into wood substrates, raising humidity levels that promote mold growth, wood rot fungi, and structural breakdown of load-bearing roof components.
Hail impacts and falling branches create additional microfractures in the protective granule coating on asphalt shingles. These damaged granules expose the asphalt layer to direct ultraviolet radiation from sunlight. UV exposure degrades the petroleum-based shingle material, cutting expected roof lifespan by 40%.
This chain of connected failures stays hidden from view. Property owners notice problems only after interior damage signs appear—ceiling water stains, white mineral deposits (efflorescence) on walls, or bubbling paint from separated drywall layers.
The Timeline of Deterioration: From Impact to Interior Damage
Understanding how roof damage moves from the outside to inside your home requires looking at research data from different weather zones and roofing materials. Hail strikes damage the protective granules on shingles within 24 hours. This damage exposes the asphalt layer underneath to harmful ultraviolet radiation from the sun.
Water seepage through broken roof membranes speeds up when temperatures swing between hot and cold. Freeze-thaw cycles cause the fastest breakdown.
Critical deterioration phases include:
- Days 1-30: Protective granules fall off and expose the underlying mat material; small amounts of water start entering through impact points.
- Months 2-6: Temperature changes make cracks bigger; wood decking absorbs 15-40% more moisture.
- Months 7-18: Insulation becomes waterlogged; water stains appear on interior ceilings and walls; structural wood begins to rot.
The speed of damage depends on roof slope angle, attic airflow systems, and moisture in the air. Steeper roofs show interior damage later than flat or low-slope roofs.
Climate factors like annual rainfall amounts, freeze-thaw frequency, and seasonal temperature ranges determine deterioration rates. Roof ventilation systems control moisture buildup and heat accumulation in attic spaces.
The roofing material type: asphalt composition shingles, metal panels, or tile systems—affects how damage spreads through the building envelope. Building code requirements and installation quality also influence the timeline from initial impact to visible interior destruction.
Why Water Intrusion Often Goes Undetected for Months
Water moves through roof systems by taking the easiest path available. The spot where water first enters a roof doesn’t match the spot where damage shows up inside a building. Water travels sideways along plywood decking, moisture barriers, and insulation before it drips into rooms people use. This sideways travel can cover several feet from the actual hole in the roof, making it hard to find the real problem during a quick look around.
Water builds up in hidden spaces behind walls and above ceilings where no one can see it. Finding this hidden moisture needs special tools instead of just looking with your eyes. Infrared cameras detect temperature differences that show wet areas in wall frames and ceiling spaces before brown stains appear.
Moisture measurement devices pick up excess water content in building materials during the early stages of a leak. When brown spots finally show on ceilings or walls, the wood, drywall, and insulation have been soaking up water for weeks or months. At this advanced stage, black mold colonies have formed, and wooden support beams have started to rot. These serious conditions need complete water damage restoration work that goes far beyond patching the roof leak itself.
The timeline of roof leak detection matters for property protection. Attic spaces, wall cavities, and insulation layers trap water without visible signs. Building materials like oriented strand board sheathing, fiberglass batts, and gypsum wallboard hold significant amounts of water before surface evidence appears.
This delayed visibility gives fungal spores time to colonize damp organic materials, creating indoor air quality hazards and compromising the structural integrity of load-bearing components.
Common Interior Warning Signs of Roof-Related Water Damage
Ceiling stains show the clearest sign that your roof has failed. These stains appear as brown, yellow, or copper-colored marks on your ceiling, drywall, and ceiling tiles. The color changes mean water has been leaking for a long time, not just once.
Water damage goes deeper than what you can see on the surface when it gets through your roof and into your home’s structure.
Watch for these warning signs inside your home:
- Musty smells and damp air mean mold and mildew are growing in hidden spaces like walls and insulation.
- Damaged walls and trim, including paint that bubbles up, baseboards that bend, and wallpaper that peels away, show that water keeps getting in.
- Mold spots that show up where walls meet ceilings, in corners, and in places where moisture barriers have broken down.
Professional inspectors use thermal cameras and moisture detectors to measure water damage when the problem is not visible to the naked eye.
These tools help identify how far water has spread and which building materials have absorbed moisture.
The Domino Effect: From Ceiling Stains to Structural Compromise
When water gets through the roof, it starts a chain reaction that damages one building part after another in a predictable order. The first ceiling stain shows that water has soaked into the insulation and drywall. These wet materials lose their ability to keep heat in or out, and they become weaker.
The moisture keeps spreading to the wooden deck under the shingles, making the wood swell and shrink. This movement pulls out nails and screws. Water travels down wooden beams and posts that hold up the building’s weight. The worst damage happens where these pieces connect together, because water pools in these spots and feeds the growth of wood-eating fungi.
Wet insulation creates cold spots that cause more water to form inside the building, spreading the damage far from where the leak started. Moisture reaches electrical boxes and wire channels, creating shock and fire dangers.
The International Building Code requires property owners to fix water damage right away when it reaches any part that supports the building’s weight. Wood rot spreads faster as time passes, making repairs cost much more. Weakened support beams create serious safety risks, including the danger of ceilings falling on people below.
Mold Growth and Air Quality Risks Following Undetected Leaks
Key signs that mold has contaminated your home include:
- Musty smells coming from inside walls, attic areas, or air vents where your heating and cooling system pulls air
- Mold can be seen showing up as black, green, or white spots on ceilings and the top parts of walls
- Health problems are getting worse, such as sneezing and a runny nose (allergic rhinitis), breathing troubles for people with asthma, and allergic reactions to mold spores
Fixing mold damage means finding and stopping the water leak first.
Restoration professionals must tear out contaminated materials using safety barriers to keep mold spores from spreading.
They use special HEPA air filters to clean the air and apply chemicals that kill mold.
These mold removal procedures cost far more money than fixing a roof leak right away would have cost.
The Cost Escalation: Comparing Immediate Repairs vs. Delayed Response
Fixing a roof leak right away costs 40-60% less than waiting more than 30 days. Water keeps spreading through your building when you delay repairs. The water damages insulation, drywall, and wooden beams. Each day of wetness creates more problems that cost more money to fix.
| Repair Timeline | What Needs Fixing |
| 0-7 Days | Seal the roof surface, fix metal flashing around edges, and replace wet insulation in small areas |
| 8-30 Days | Replace ceiling drywall panels, remove soaked insulation, treat wooden frame pieces, and clean mold growth |
| 31-90 Days | Replace damaged wooden beams, remove all mold throughout affected areas, clean air ducts, and tear out wet flooring |
| 90+ Days | Replace entire roof layers, rebuild wall interiors, check electrical wiring safety, and perform a complete environmental cleanup |
Water damage spreads through connected building parts. A roof leak lets moisture into the insulation first. Wet insulation cannot protect against heat or cold. The water then soaks the ceiling materials and wooden supports. Mold spores grow in damp areas within 24-48 hours. These organisms release particles that affect indoor air quality.
Wooden structural members lose strength when saturated. Metal fasteners corrode when exposed to constant moisture. Electrical systems face short-circuit risks near water intrusion points.
Waiting to fix a small leak turns a simple weatherproofing repair into a complete building restoration project. Multiple contractors must coordinate work across roofing, carpentry, HVAC systems, and environmental health services. The repair scope expands from one building layer to multiple interconnected systems.
Professional Roof Inspection: What Experts Look for After Hailstorms
After a hailstorm, licensed roof inspectors follow a systematic process to identify both visible and hidden damage throughout the roofing system and exterior building components. They evaluate impact severity by examining dent depth, strike patterns, and whether the underlying materials have been compromised. Inspectors also document findings with detailed photographs, moisture readings, and evidence linking exterior hail impacts to potential interior leak paths.
Key areas inspectors evaluate include:
- Shingles – Granule loss, impact dents, and damaged seal strips that can allow water penetration
- Flashing and metal components – Edges around chimneys, valleys, vents, and roof transitions where hail can loosen protective coverings
- Exterior roof features – Soffits, fascia boards, and gutters that may show dents or openings where water can enter behind walls
Advanced tools such as infrared thermal imaging help detect hidden moisture by identifying temperature differences in roofing materials. This technology allows inspectors to locate water intrusion before it leads to rot or mold.
Damage assessment typically includes:
- Measuring hail impact size and distribution
- Estimating the percentage of shingle granule loss
- Checking the structural condition of the roof decking
- Identifying failed sealants or fastener seals
- Evaluating dents or deformation in metal roof components
Inspectors also compare damage patterns with National Weather Service hail reports, including storm dates and recorded hail sizes. This verification helps support insurance claims by confirming when the damage likely occurred.
Because roof edges, corners, and material transition points experience stronger impact forces, inspectors pay close attention to these vulnerable areas where water intrusion is most likely to cause structural damage.
Documenting Storm Damage for Insurance Claims and Future Protection
Start taking pictures right after a hailstorm hits your property. Place objects like coins, rulers, or wood pieces next to each dent or hole so the photos show how big the damage is. Make sure your camera or phone records the date, time, and location automatically. These details prove the damage happened during the storm.
Take pictures of your roof from ground level and from ladders if safe. Check your attic for water stains, wet insulation, or damp wood beams. Photograph any broken siding, gutters, window screens, or vents.
Insurance companies need organized proof that includes:
- Measurements of hailstone size (diameter in inches)
- Number of dents in each square foot of surface
- Photos connecting outside dents to inside water leaks
Hire a certified roof inspector to write a formal report. This expert document should describe missing roof granules, exposed fibers underneath shingles, and any bent or cracked materials. The technical language in professional reports helps prove your claim is valid.
Keep broken shingles, damaged siding pieces, and cracked vent covers in a safe place. Physical samples help if the insurance company questions your claim amount.
Take photos before repairs start, during the work, and after completion. This timeline shows your property’s condition before the storm. Future hailstorms will cause new damage, and these baseline photos prove which problems are old versus new. Without this record, insurance adjusters may deny future claims by saying the damage existed before.
Store all documents—photos, inspection reports, repair estimates, and material samples—in both printed files and digital backups. Label each photo with the date, location on the property, and type of damage shown.
Preventive Measures and Maintenance to Minimize Hail Damage Risks
Property owners cannot stop all hail damage, but they can reduce how much their buildings get hurt. The key is choosing strong materials and keeping up with regular maintenance.
Impact-resistant roofing materials protect buildings better than standard materials. Class 4-rated products pass the toughest UL 2218 hail impact tests. These materials stop hailstones from breaking through the roof surface. Regular roof inspections help find problems like loose flashing, old sealants, and missing shingles. Fixing these weak spots before a storm hits keeps the building safer.
Critical preventive measures include:
- Installing impact-resistant shingles, metal roofing panels, or concrete roof tiles that meet ICC-ES AC438 performance standards for hail resistance
- Keeping attic spaces properly ventilated and insulated to stop temperature changes that weaken the roof deck and underlayment materials
- Getting professional roof inspections twice each year (spring and fall) to find and fix structural problems, worn fasteners, damaged underlayment, and deteriorated roof coatings
These maintenance steps make roofs last longer and stop water from getting inside the building after hailstorms damage the exterior surface.
Property insurance providers often require Class 4 impact-resistant roofing in high-risk hail regions. Building codes in hail-prone areas may mandate specific roof construction methods and material specifications to protect structures from severe weather events.